The information below is for the die-cut decals with no background. The printed stickers can be applied like any bumper stickers. For static clings, just peel them off and place on inside of the window.
Caution: Only apply decals and transfers when the surface temperature is 60-80 degrees Fahrenheit (15-26 Celsius)
Troubles? Scroll down for info on correcting application problems.
Small
Vinyl Adhesive Die-Cut Decal Transfer
Tools Required: Soap & Water, Rubbing Alcohol, Lint-free Cloth, and Plastic Card
1.) Clean the area where the decal will be placed. DO NOT USE WINDOW CLEANER! First wash with 30/70 dish soap and water. Rinse and dry with lint free cloth. Then wash again with 50/50 rubbing alcohol and water. Dry with lint fee cloth. Do not use citrus cleaner or any other commercial cleaners as the are designed to remove adhesives and will interfere with the decal's adhesive and your decal will fall off.
2.) The decal will be visible thru the transfer paper. SLOWLY separate and peel the protective backing paper from the transfer paper which carries the graphic. If needed, use a pair of tweezers to remove any backing paper that sticks to your decal.
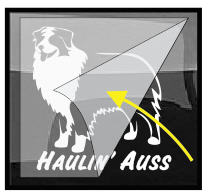
3.) Slowly roll the transfer paper with exposed graphic onto the surface and begin to lightly rub down vinyl EVENLY from CENTER, from top to bottom until you reach the end. This is your big opportunity to avoid bubbles and creases by going SLOWLY and applying EVENLY!!!
4.) Rub down firmly with fingers.
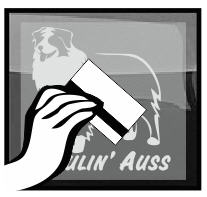
5.) Now use the plastic card to slowly but firmly rub graphic onto the surface, so that transfer paper will separate from graphic.
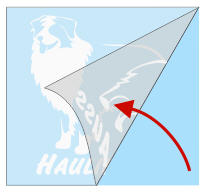
6.) SLOWLY pull away transfer paper at a sharp angle, (because it will want to resist!) It's okay to leave your transfer tape on for a few hours or even over night before taking it off.
7.) Tiny bubbles will disappear by themselves. Pop any large bubbles with a pin and rub. Warming the vinyl with a hair dryer will help in rubbing out bubbles and creases. Warm vinyl is pliable.
8.) Use left-over piece of backing paper or a soft cloth to shield your vinyl from direct contact with credit card to rub out a bubble or crease.
BUBBLES! There may be a couple of reasons that cause bubbling. Here are some solutions.
1.) Be sure you have removed the clear transfer tape on top of your decal. It is a low-tack, temporary tape that is supposed to be removed. It will bubble badly and look awful. Your actual decal is under the transfer tape and will look great when you remove the transfer tape.
2.) Tiny bubbles will disappear by themselves in a few weeks as the air escapes.
3.) Large bubbles can be pricked with a pin and rubbed with your finger. Warm the vinyl first with either a blow dryer or exposure to warm sun. Warm vinyl is more pliable, cold vinyl is brittle.
WON'T STICK! It's hard to say without being there why a decal doesn't stay put. Here are some common reasons:
1.) Surface has residue, either unseen dust, oil or wax will interfere with the decal. Clean again, using soap and water and a scrubby, followed by 50/50 rubbing alcohol and water. Dry with lint free cloth.
2.) Surface was cleaned with window cleaner, which interferes with the adhesive. Wash good with soap and water to remove any trace of window cleaner.
3.) Surface is too hot. This will melt the adhesive on contact. Cool with water. Once the adhesive bonds with the surface, hot weather will not bother it.
4.) Surface was too cold. This will freeze the adhesive on contact. Warm surface with a hair dryer or warm water. Once the adhesive bonds with the surface, the cold will not bother it.
5.) Some of the backing paper stuck to the adhesive. Lay the decal down, adhesive side up and remove any debris with tweezers. If you store your decal where it may be exposed to humidity, or if it was exposed to moisture during transport, the backing paper breaks down and sticks to the adhesive.
If you try all this and still can't get your decal to stick, contact us for help.
Extra Large Decal Application
Tools Required: Alcohol, x-acto knife, auto masking tape, credit card, and a push pin.
1.) Clean the area where the decal will be placed. DO NOT USE WINDOW CLEANER! First wash with 50/50 dish soap and water. Rinse and dry with lint free cloth. Then wash again with 50/50 rubbing alcohol and water. Dry with lint fee cloth. Do not use citrus cleaner or any other commercial cleaners as the are designed to remove adhesives and will interfere with the decal's adhesive and your decal will fall off.
2.) Start by measuring & positioning decal on area, secure with auto masking tape laid out in a vertical line down the center of the decal. This way you can apply half of the graphic at a time, starting from the center.
3.) The decal will be visible thru the transfer paper. SLOWLY separate and peel the protective backing paper from the transfer paper which carries the graphic. Keep an x-acto knife handy, as your decal may want to stay stuck to the backing paper. In that case, use your knife it to help lift away the edge of the graphic from backing paper, then rub the transfer tape on that area again before continuing on.
4.) Cut away exposed part of backing paper, (be careful because adhesive side of graphic is exposed and ready to stick!)
5.) Slowly roll transfer paper with exposed graphic back towards it's position on the surface and begin to lightly rub down vinyl EVENLY from CENTER, from top to bottom until you reach the end.
This is your big opportunity to avoid bubbles and creases by going SLOWLY and applying EVENLY!!!
6.) Rub down firmly with fingers. Final rub with credit card will be after the entire decal is applied.
7.) With the left side now stuck to surface, you can now remove masking tape. Fold back other side and begin removing backing paper.
8.) SLOWLY and carefully begin rubbing down FROM the CENTER the remaining graphic.
9.) Now use the credit card to slowly but firmly rub graphic onto the surface, so that transfer paper will separate from graphic.
10.) SLOWLY pull away remaining transfer paper at a sharp angle, (because it will want to resist!)
11.) You may get a bubble no matter how slow or careful you are. Not to worry! Prick the bubble with a pin or x-acto knife with surgical precision.
12.) Use left-over piece of backing paper or a soft cloth to shield your vinyl from direct contact with credit card to rub out bubbles or even out creases.
Removing an Adhesive Decal
You will need a plastic putty knife and something to warm the decal, like a hair dryer or just sunshine. Warm vinyl is pliable, cold vinyl is brittle. Also, a bit of window cleaner warmed in the microwave and a sponge. First, warm the decal well. Then lift a section with the putty knife, and dab a little warm window cleaner under it. Keep repeating that process. The window cleaner helps to neutralize the adhesive, so dabbing a bit under where you lift will help with lifting the next section with your putty knife. Warming it will keep your decal from cooling down when you use the window cleaner. Once you have the decal off, you can remove any left over residue with rubbing alcohol and a scrubby.
If the decal is on a window, you can also use a razor blade to remove. If it's on a painted surface, stick with the plastic putty knife.